Achieving data intelligence starts with getting data into the platform which is the domain of data engineering. Data Engineering involves not only getting data into the platform but also transforming that data into useable assets and managing this at scale.
Databricks provides a powerful solution for this with Databricks Lakeflow.
Let’s take a closer look at the core features of Lakeflow.
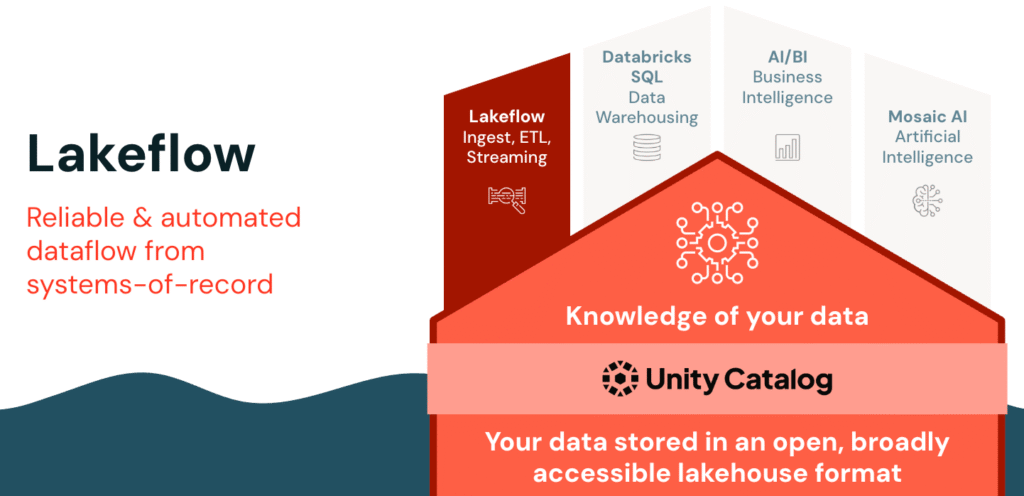
Lakeflow consists of three powerful components:
- Connect for fast, no-code data ingestion from any source;
- Spark Declarative Pipelines for automated and reliable batch or streaming transformations using SQL.
- Jobs for smart orchestration with real-time triggers and monitoring.
Together, they deliver a seamless, fully governed data engineering workflow within Databricks.
Let’s look at a high-level overview of each component of Lakeflow.
Lakeflow Connect
So what exactly is Lakeflow Connect?
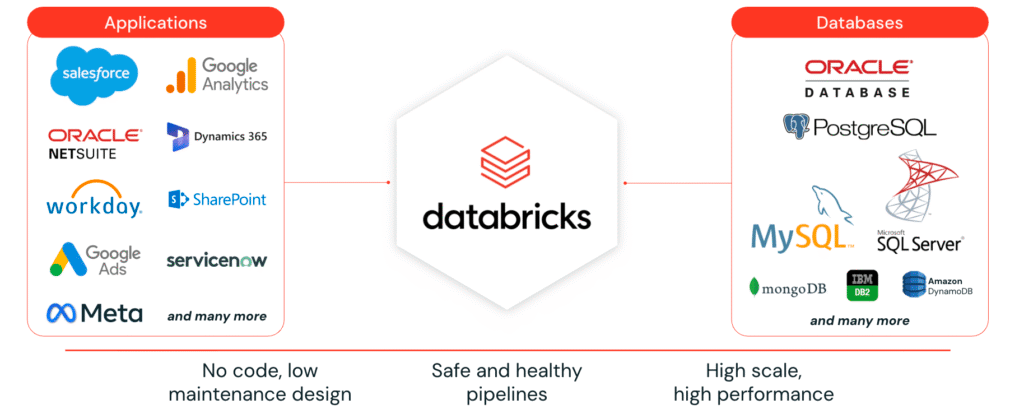
Lakeflow Connect provides simple, efficient connectors to ingest data into the Databricks Lakehouse from a wide range of sources, including enterprise applications, databases, cloud storage, local files, message buses, and more.
It supports three main types of ingestion:
- Manual File Uploads: This allows users to upload local files directly to Databricks into either a volume or as a table, making it extremely easy to bring local data into the platform quickly.
- Standard Connectors: These connectors support data ingestion from various sources such as cloud object storage, Kafka, and more. They support multiple ingestion modes, including batch, incremental batch, and streaming. We’ll explore these ingestion methods in more detail shortly.
- Managed Connectors: Purpose-built for ingesting data from enterprise applications, including SaaS platforms and databases. They leverage efficient incremental read/write patterns to provide scalable, cost-effective, and high-performance data ingestion into the lakehouse.
Taking a closer look at Lakeflow Connect Managed Connectors, they offer built-in, no-code connectors for popular databases and enterprise applications. With a simple interface, it enables fast, scalable, and secure data ingestion into the Databricks platform, all governed by Unity Catalog and powered by serverless compute. With Unity Catalog, data is kept automatically updated, and ensures full observability, governance, and autoscaling across the data ecosystem.
Lakeflow Spark Declarative Pipelines
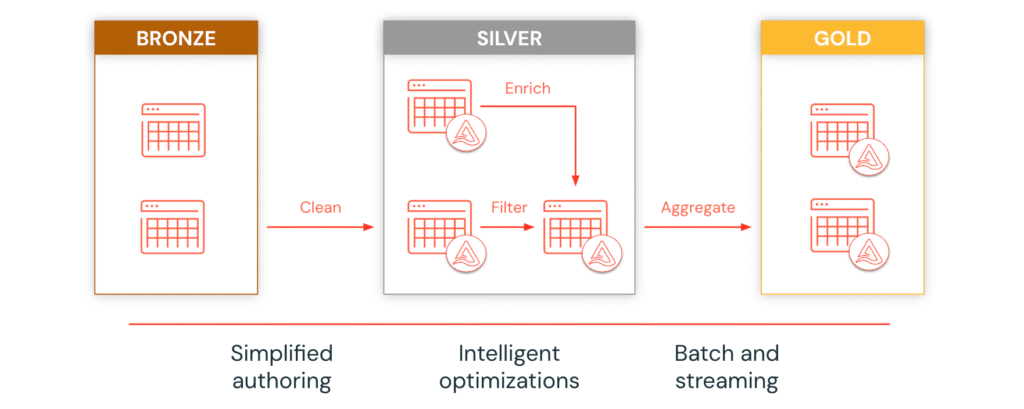
Once data is ingested, Lakeflow Spark Declarative Pipelines accelerates ETL with declarative SQL, allowing analysts to build production-grade incremental batch and streaming pipelines. Spark Declarative Pipelines support the medallion architecture, incremental processing, and intelligent workload optimization for faster and more efficient ETL pipelines.
Lakeflow Jobs
Finally, Lakeflow Jobs simplifies orchestration with smart triggers, real-time monitoring, and automated workloads. Its serverless design supports event-based triggers, continuous execution, and complex DAGs, ensuring reliable and scalable production workloads.
With Lakeflow Connect, Pipelines, and Jobs, you can streamline your entire data workflow, from ingestion to orchestration, all within the Databricks platform.
Lakeflow Connect Ingestion Techniques Overview
Let’s focus on Delta Lake Lakeflow Connect techniques—specifically, how to bring raw data into our Delta Lake.
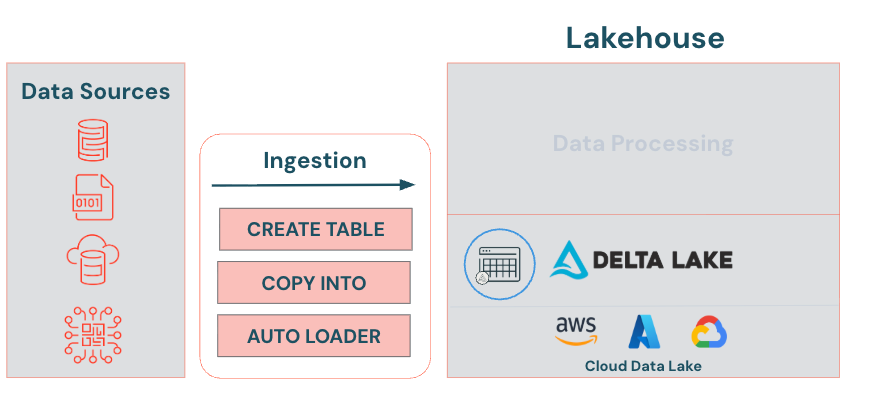
Upload UI
Provides a point and click interface to upload files to create a table. With the Upload UI you can ingest CSV, TSV, JSON, Avro, Parquet, or text files. The Upload to volume UI allows you to upload files in any format to a Unity Catalog volume, including structured, semi-structured, and unstructured data. They represent a logical volume of storage in a cloud object storage location. Volumes are intended for path-based data access to files only. Use tables when you want to work with tabular data in Unity Catalog.
CREATE TABLE AS (CTAS)
Creates a table by selecting data from an existing table or data source. By default, it creates a Delta table in Databricks. You can explicitly specify the USING DELTA keyword when creating a table, but this is optional.
CREATE TABLE mydeltatable
USING DELTA <— Optional
AS
your query
COPY INTO
Offers several advantages for Lakeflow Connect into Delta lake. First it loads one or more files from a file location into a Delta table. It supports various file formats and cloud storage locations. It automatically handles schema changes, seamlessly integrating new data formats without manual adjustments. Lastly, it’s idempotent, meaning it will skip files that have already been loaded, increasing efficiency.
COPY INTO mydeltatable
FROM ‘your-path’
FILE_FORMAT = ‘format’
FILE_OPTIONS = (‘format-options’)
Auto Loader
Incrementally and efficiently processes new data files as they arrive in cloud storage based on an input directory path. It receives notifications from the cloud source and ingests only new files, reducing the need for full reprocessing and enhancing efficiency. Auto Loader also automatically infers and evolves schemas, detecting new columns and handling schema changes without manual intervention. Additionally, it can “rescue” unexpected data, such as data with differing types, and set it aside for review.
Ingesting Data into Delta Lake
Classroom Setup
Run the following cell to configure your working environment for this lesson.
#################################################################################
# Set python variables for catalog, schema, and volume names (change, if desired)
catalog_name = "dbacademy"
schema_name = "ingesting_data"
volume_name = "myfiles"
#################################################################################

#################################################################################
# Create the catalog, schema, and volume if they don't exist already
spark.sql(f"CREATE CATALOG IF NOT EXISTS {catalog_name}")
spark.sql(f"CREATE SCHEMA IF NOT EXISTS {catalog_name}.{schema_name}")
spark.sql(f"CREATE VOLUME IF NOT EXISTS {catalog_name}.{schema_name}.{volume_name}")
#################################################################################

#################################################################################
# Creates a file called employees.csv in the specified catalog.schema.volume
import pandas as pd
data = [
    ["1111", "Kristi", "USA", "Manager"],
    ["2222", "Sophia", "Greece", "Developer"],
    ["3333", "Peter", "USA", "Developer"],
    ["4444", "Zebi", "Pakistan", "Administrator"]
]
columns = ["ID", "Firstname", "Country", "Role"]
df = pd.DataFrame(data, columns=columns)
file_path = f"/Volumes/{catalog_name}/{schema_name}/{volume_name}/employees.csv"
df.to_csv(file_path, index=False)
################################################################################
Please note:
We are using calls to spark.sql() instead of using regular SQL commands. This allows us to use python’s f-strings to insert variables into the SQL commands.
A. Configure and Explore Your Environment
1. Setting Up catalog and Schema
Set the default catalog schema. Then, view the available tables to confirm that no tables currently exist in your schema.
## Set the default catalog and schema
spark.sql(f"USE CATALOG {catalog_name}")
spark.sql(f"USE SCHEMA {schema_name}")
1A. Using SQL
%sql
-- Display available tables in your schema
SHOW TABLES;
1B. Using PySpark
# # Set the default catalog and schema (Requires Spark 3.4.0 or later)
spark.catalog.setCurrentCatalog(catalog_name)
spark.catalog.setCurrentDatabase(schema_name)

# Display available tables in your schema
spark.catalog.listTables(schema_name)
2. Viewing the available files
View the available files in your schema’s myfiles volume. Confirm that only the employees.csv file is available.
NOTE: Remember, when referencing data in volumes, use the path provided by Unity Catalog, which always has the following format: /Volumes/catalog_name/schema_name/volume_name/.
spark.sql(f"LIST '/Volumes/{catalog_name}/{schema_name}/{volume_name}/' ").display()B. Delta Lake Ingestion Techniques
Objective: Create a Delta table from the employees.csv file using various methods.
- CREATE TABLE AS (
CTAS) - UPLOAD UI (
User Interface) - COPY INTO
- AUTOLOADER (
Overview only,outside the scope of this module)
1. CREATE TABLE (CTAS)
Create a table from the employees.csv file using the CREATE TABLE AS statement similar to the previous demonstration. Run the query and confirm that the current_employees_ctas table was successfully created.
#  Drop the table if it exists for demonstration purposes
spark.sql(f"DROP TABLE IF EXISTS current_employees_ctas;")

#  Create the table using CTAS
spark.sql(f"""
CREATE TABLE current_employees_ctas
AS
SELECT ID, FirstName, Country, Role
FROM read_files(
  '/Volumes/{catalog_name}/{schema_name}/{volume_name}/',
  format => 'csv',
  header => true,
  inferSchema => true
 );""")

#  Display available tables in your schema
spark.sql(f"SHOW TABLES;").display()
Query the current_employees_ctas table and confirm that it contains 4 rows and 4 columns.
%sql
SELECT *
FROM current_employees_ctas;
2. UPLOAD UI
The add data UI allows you to manually load data into Databricks from a variety of sources.
- Complete the following steps to manually download the employees.csv file from your volume:
- Select the Catalog icon
 in the left navigation bar.b. Select the refresh icon
  to refresh the catalog.c. Expand the dbacademy catalog. Within the catalog, you should see a variety of schemas (databases).d. Expand ingesting_data schema. Notice that your schema contains Tables and Volumes.e. Expand Volumes then myfiles. The myfiles volume should contain a single CSV file named employees.csv.f. Click on the kebab menu on the right-hand side of the employees.csv file and select Download Volume file. This will download the CSV file to your browser’s download folder.
- Select the Catalog icon
- Complete the following steps to manually upload the employees.csv file to your schema. This will mimic loading a local file to Databricks:a. In the navigation bar select the ingesting_data schema.b. Click the ellipses (three-dot) icon next to your schema and select Open in Catalog Explorer.c. Select the Create drop down icon
 , and select Table.d. Select the employees.csv you downloaded earlier into the available section in the browser, or select browse, navigate to your downloads folder and select the employees.csv file.
- Complete the following steps to create the Delta table using the UPLOAD UI.a. In the UI confirm the table will be created in the catalog dbacademy and the ingesting_data schema.b. Under Table name, name the table employees_upload.c. Select the Create table button at the bottom of the screen to create the table.d. Confirm the table was created successfully. Then close out of the Catalog Explorer browser.